Rainforest Photography
 It’s no coincidence that so many of the world’s great wildlife locations are remote and confront the photographer with extremes: from the ice caps to the tropics very different prevailing conditions test both photographer and equipment to the full and often in very different ways.
I’m fortunate enough to visit the tropics on a regular basis and various prime places provide a stage for the majority of my wildlife photography, but if I had to pick a favourite, both in terms of seeing wildlife and tackling the challenges of photographing it, I would have no hesitation in heading for a rainforest.
There is no more exciting or exhilarating habitat on earth to explore and there are few places that set such stringent challenges to capturing memorable images. I have been visiting and photographing rainforests for over 30 years and have altered and refined various techniques and ways of working frequently. Each time I visit a rainforest location, I try something new - an idea, an approach, a piece of kit or a perspective. I am constantly learning (and hopefully still improving).
Do you want to find out more about Nick's safaris and photography trips?
Before You Leave
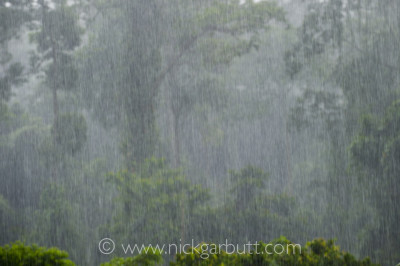
Do not underestimate just how torrential downpours can be in a tropical rainforest. It is all but impossible to stay dry.
Preparation is Key
As with trips to all destinations, the secret is to be prepared. This means being fully familiar with your equipment and how it works (see Safari Photography) and being prepared for the challenges and rigors of environment.
By their very nature, rainforests are wet, sometimes very wet, often hot and generally humid. So the challenge is keeping yourself and your equipment dry. Often keeping yourself dry proves impossible: good quality rain wear (Gortex etc) may keep the majority of water out, but during torrential tropical downpours there is no garment on earth that is totally effective. Coupled with this, the extra layer generally causes a dramatic increase in perspiration (even with so called “breathable” fabrics) and you will soon find yourself soaked from the inside. My solution generally is to give up and forget trying to keep myself dry and concentrate on looking after my equipment. However, as a concession I sometimes use an over-size poncho as this allows me to also cover whatever camera equipment I am also carrying. In conjunction with this, a small ‘pocket-size’ umbrella can be useful for keeping water off cameras.
Rainforest Equipment
Equipment is a very different matter. Water and photographic gear are hardly compatible bed partners and the problems are compounded today with the added susceptibility of intricate and elaborate electronics. That said, good quality equipment is far more robust and resilient than most people give it credit for.
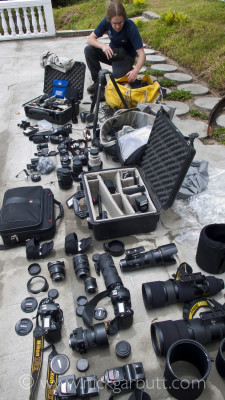
Peli Cases and dry bags are essential for prolonged trips to a rainforest. Here Alex Hyde and myself are drying our kit after two weeks on the Masoala Peninsula in Madagascar.
First, things first, you need to transport and store gear appropriately. In this regard watertight hard cases (such as Peli Cases) are ideal in wet humid environments (they also have another important application, more of which later). The down side is they are not a practical solution for actually carrying gear once you are in the rainforest. My solution is to take some gear in a photo backpack (I use a Gura Gear Bataflae 32) and some gear in a Peli Case, which I check-in on flights.
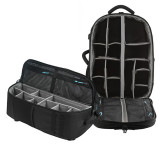
The Gura Gear Bataflae 32L is excellent for carry gear in a rainforest, provides easy access and has a very useful waterproof cover.
Depending on the combination of camera bodies, lenses and accessories I am taking, I use one of two Peli Cases. The first is a 1560, which is fitted with padded dividers that can be reconfigured to accept different lenses etc. However, sometimes this in combination with the Gura Gear Bataflae 32 is insufficient. When I need maximum capacity I use a Peli Air 1605, fitted with a TrekPak insert that allows the compartmentation to be altered according to the kit being carried. This permutation allows me to take 3 or 4 bodies, numerous lenses, from super telephoto to extreme wide angle, and a variety of flashguns and other accessories.
Once in the field, it is obviously impractical carrying all of this around the rainforest. Hence, I tend to take specific kit combinations to suit whatever photographic situation I am anticipating and targeting at any time. An early morning on a canopy walkway will normally involve a super telephoto lens (I have water proof covers should the heavens open), whereas the middle of the day (when it is cloudy) or night walks are generally devoted to macro options and smaller subjects, so a couple of small lenses and flash set ups fit the bill. My Gura Gear Bataflae 32 is generally used for carrying this.
Nonetheless, equipment still gets damp. Even if you are able to avoid direct drenching, the excessive humidity in rain forest environments will always find its way into cameras and lenses. In extreme cases, this can be a severe problem as damaging fungus may form on glass elements – sometimes as quickly as within a week (although this is exceptional). To combat this, I make sure I remove all surface moisture from equipment as soon as possible and never leave it for any length of time sitting in a damp vest, bag or backpack. Also it is worth carrying some bin liners or other large plastic bags that can be used in a variety of circumstances to protect your gear.
Also every night (where possible) I store my equipment in a sealed container with a desiccant like silica gel. This is the other use for my Peli Air 1605: I empty it completely (TrekPak dividers and all), then place each camera body, lens, and accessory inside with plenty of space between them for air circulation, and add containers of silica gel, then shut the lid tight. Overnight, the gel sucks all the moisture out of the air inside and from the gear (silca gel crystals are deep blue and turn pink when fully hydrated. They can be heated so the absorbed water evaporates and they revert to blue for re-use).
Keep it Steady
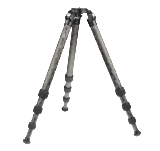
A good sturdy tripod is always recommended and essential in a rainforest. This is my favoured RRS TVC-34L.
Light levels in rainforests are often low, which correspond to high ISO values and often relatively slow shutter speeds. This means that a capacity to hold your camera firmly and absolutely still is imperative. Once again a good quality tripod is essential. Any short cuts taken here, will be rued and regretted.

I have always preferred ball-and-socket tripod heads as they provide maximum maneuverability and ease of use. This is my RRS BH 55 with a quick release clamp.
Many different styles and models are available, but very few are actually suitable for serious photography, especially in a rainforest. These are the factors I would consider most important.
- Light but sturdy construction. Carbon fibre tripods may not be cheap, but are worth the expense.
- Screw-lock legs, rather than snap fixtures than may over time weaken resulting in dreaded 'leg sag'.
- The capability to splay the legs flat, so that a camera can be supported at ground level.
- A detachable head.
The final point alludes to something equally important - the tripod head. Most better quality tripods are sold without a head, allowing you to choose the most suitable type and style for your photographic needs. Several different types are available that broadly fall into four categories.
- Ball-and-socket. The release of one knob allows movement in all three planes and in all directions. Ideal for general photography, close control and fine-tuning.
- Three-way pan. Separate knobs control the three planes of movement.
- Fluid. Movement in two planes is cushioned allowing for very smooth movement. Suitable for video and long lenses
- Gimbal. Lever-balance systems designed for heavy equipment. Ideal for long, large telephoto lenses.
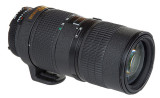
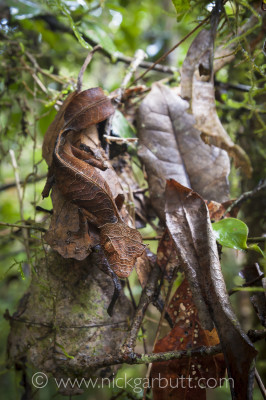
Although now old and rather ‘dated’, the Nikkor 70-180mm zoom macro remains a very versatile option and can be used with mirrorless Z cameras with an F-mount to Z-mount adapter. Sadly it is no longer made, but is occasionally available second hand.
Starter Kit for Rainforests
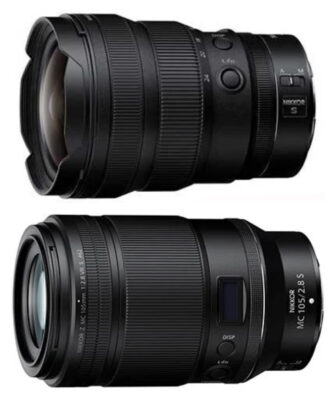
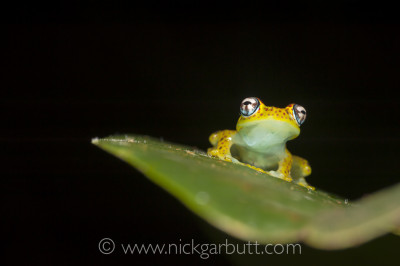
Two essential lenses for rainforets. Firstly, a close focusing wide angle, like the Nikon Z 14-24mm, that is ideal in the tight confines to show the rainforest environments. And secondly, a medium telephoto macro, like the Nikon Z 105mm micro, which is my ‘go to’ lens for smaller subjects.
The following would be my recommended “basic” kit for anyone travelling to a rainforest area for the first time. This will allow you to concentrate more on the smaller, more ‘accessible’ subjects and help keep everything ‘manageable’. More bulky and heavier items like longer telephoto lenses are generally necessary for mammal and bird photography, and will require greater investment and a more concerted effort.
- Sturdy tripod.
- Camera body.
- Wide-angle zoom e.g. 14-24mm, 16-35mm or 24-120mm.
- Medium telephoto macro e.g. 105mm or 180mm macro.
- Medium telephoto zoom e.g. 70-300mm.
- Dedicated TTL flash with off-camera cord.
- Soft box diffuser.
- Polarising filter.
Once You Get There
Seeing the Wood for the Trees
As already mentioned, rainforests are difficult places to work, especially for prolonged periods. The heat and humidity are tiring, biting insects can be a regular irritant and the constant damp makes keeping everything working tough. They can also be overwhelming and daunting and it is often difficult to know how to start and where to begin. The secret is to break it down into manageable component parts, rather than trying to tackle the whole thing.
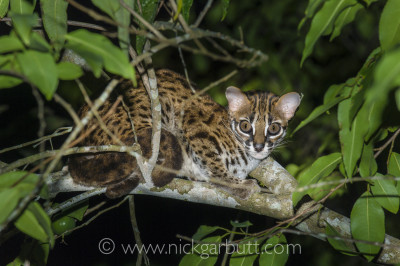
Sometimes normally shy and reclusive species become tolerant around lodges and research camps. Here a leopard cat sits in a tree adjacent to a lodge in Borneo.
Mammal and bird photography in many localities is difficult at the best of times, as considerable time and effort may need to be spent to get close to subjects. This is especially so in rainforests, where many species live high in the canopy and are inaccessible. However, it is often the case that some species, including primates become habituated around well-established tourist lodges or research centers within forests and concentrating efforts around these is often rewarding. Also lodges in some places have canopy towers and walkways that are excellent places for photography, especially early and late in the day.
However, if you are a relative newcomer to rainforests, my advice would be to initially concentrate your photographic efforts on the habitat itself and smaller less mobile subjects like, flowers, insects, other invertebrates, frogs and reptiles that are often easier to find. There are two advantages to this, firstly you’ll return home with more pictures and secondly you won’t need to carry large amounts of heavy equipment.
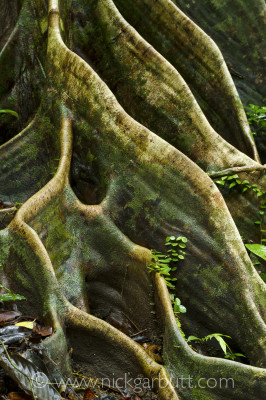
It pays to look for interesting elements within the forest. Here the buttress roots of Shorea tree in Danum Valley, Borneo make for an eye-catching composition.
You might automatically assume that being surrounded by forest would make habitat shots easy. Not so. Without careful composition there’s a tendency for these photographs tend to look very messy and cluttered: a mass of tangled greens and not much else (the same is true of woodland photography anywhere). There are two approaches. Firstly, for forest interiors use a wide-angle lens and select a composition with a strong foreground element, ideally some space behind and then a well-foliated backdrop at the rear without too much bright sky peeping through. As light levels are invariably low, cameras should always be held firmly on a tripod and judicious use of fill-in flash can lift the foreground. For this I often use a soft box diffuser to make results more natural. On overcast days with nice diffuse light, an aperture/shutter speed combination on or just under the ambient exposure value and a flash compensation setting of –1.3 to –2.0EV generally works well, but you will need to experiment.
Grand scale photographs of rain forest exteriors lend themselves to short and medium telephoto lenses that pick out specific elements of an overall vista. Here there needs to be lots of space between you and the subject: view points over the canopy or views up and down rivers flanked by forest are ideal. Concentrate on early mornings when mist and cloud hangs over the forest adding some contrast, depth and a great deal of atmosphere. Again a tripod is obligatory. With both interiors and exteriors, saturation can be altered to suit with a polarising filter.
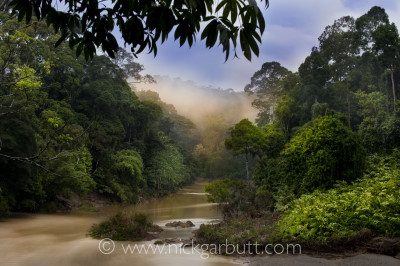
Vantage points along rivers are ideal for gaining a perspective of early morning mists and sunlight: the Segama River, Danum Valley, Borneo.
For other subjects like flowers, insects, frogs and reptiles it pays to engage the help of a local guide, especially if you are unfamiliar with the location. For a modest investment you will certainly cover a greater breadth of subjects and equally importantly will know which potentially hazardous ones to avoid approaching too closely, like irritative and poisonous plants, stinging insects or venomous snakes.
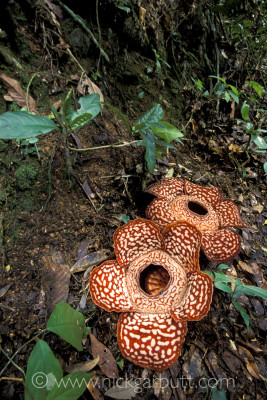
Taken with a 17-35mm wideangle, this shot clearly shows the rare double bloom of Rafflesia pricei within the environment.
During the day, I look for flowers, lizards and snakes especially and concentrate on compositions that show the subject clearly in situ. There’s not point being in the middle of a rainforest teeming with life and ending up with photographs that look as though they were taken in a staged set in captivity. In these instances my favourite lens is a close focusing wide angle zoom (e.g. 17-35mm f/2.8) or even a fisheye: with the subject dominating the foreground and a curtain of forest behind, compositions can be dramatic. Once again the use of trace amounts of fill-in flash help emphasise the subject, but make sure you take the flash off-camera with a dedicated cord. You will then be able to direct the flash appropriately and avoid creating a shadow with the front of the lens.
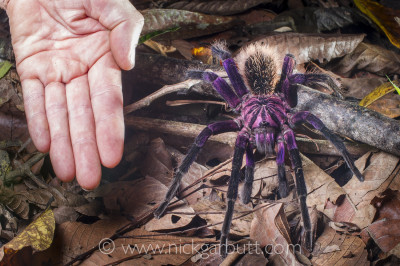
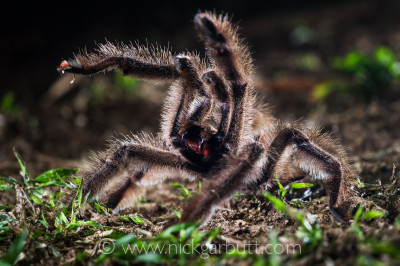
Night walks in rainforests are always exciting as you have no idea what you might find next. I came across this magnificent Colombian Purple Bloom Tarantula (Xenesthis immanis) walking over the leaf-litter.
In many rainforest areas (for instance Madagascar and Borneo) an added dimension is to go out looking for wildlife at night. After dark a completely new cast of characters potentially parade onto the photographic stage; various invertebrates, reptiles and, in particular, frogs all make prime subject material.
In this instance, I carry only a simple medium telephoto macro set up with two or three small flashguns that can be fired remotely in concert (for instance, with Pocket Wizards). I also use soft boxes (like the LumiQuest 'Big Bounce') to modify the light and reduce deep shadow areas. As ever, I still use a tripod.
In short, the secret when working in rainforest is to keep it manageable and simple. There are numerous difficulties already working against you (damp, heat, humidity, low light etc) so over complicating the issue is counter productive. By concentrating on accessible and controllable subjects your frustration levels will reduce and success rates will be much higher. When you have become comfortable with the challenges the environment presents, then perhaps consider expanding your repertoire on future visits. And believe me once you have been to a tropical rainforest, you will want to return time and time again.
Dawn to Dusk and Changing Light
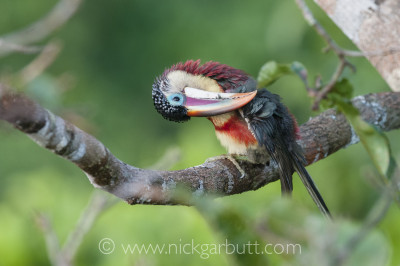
I was on a tower 40m up overlooking the canopy in the Brazilian Amazon, when I got this shot of a Curl-crested Araçari preening.
No matter what time of day, light is all too often a limiting factor in a rainforest. Other than those times you are able to make use of canopy towers or walkways, your photography is going to be limited to the forest floor, where as little as 10% of the light falling on the canopy may reach. Hence, using a tripod become obligatory as shutter speeds will often be slow and in conjunction, ISO ratings will often need to be high.
Until the sun breaks over the horizon, light levels will be extremely low; even when it is light above the trees, the forest floor can feel like it is still night time. This obviously limits opportunities, and often means photos may still require the addition of light from a flash.
Early mornings in rainforests are very often misty too, with the mist clinging to the canopy, even if the sky is clear above. However, when rays of direct sun light do break through, the effects can be simply wonderful. This is perhaps my favourite time of day in a rainforest: the combination of magical mists and golden shafts of light percolating and penetrating through the shroud creates a mystical, ethereal atmosphere that is perfect for taking evocative photos.
To take advantage of these conditions you do of course need to get an appropriate vantage point. Here canopy towers, platforms or walkways can be ideal. If these structures are not available, try to find appropriate breaks in the forest where it is possible to see edges along lines of trees, where the mist and canopy can be seen mingling. Views up and down rivers offer this and are especially good where a river bend and overhanging foliage can be used to frame the composition.
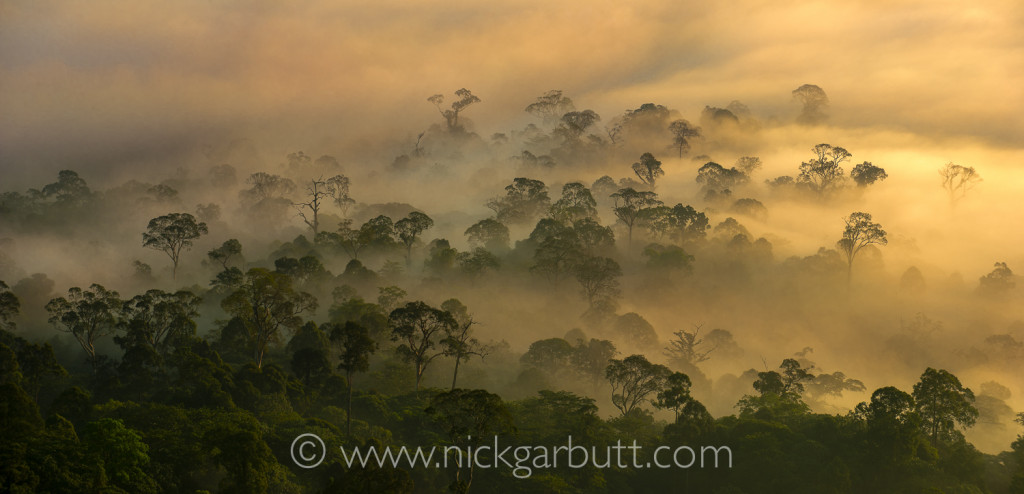
There are few more spectacular and evocative sights in the natural world than dawn over a tropical rainforest: Danum Valley, Borneo.
Of course the early morning is also when so many animals are stirring and begin their daily routines. If you are interested in photographing birds, this is certainly the time to be at the top of a canopy tower as the first hour or so after sunrise is when bird activity is greatest and the light can be at its best. Generally speaking, by 08.30am the light, if direct, is on the cusp and is already becoming too harsh. However, if the morning mist persists for longer this does prolong photography as the mist is able to diffuse the light's increasing harshness, often giving it a pleasing 'watery' quality. But once the sun burns through the last mist properly, it is probably time to head back to the lodge for breakfast.
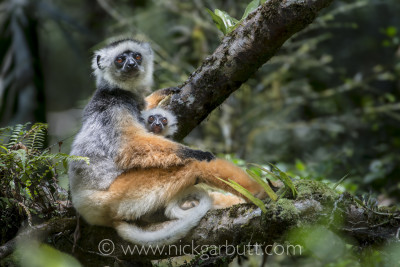
This shot of a Diademed Sifaka with its infant was taken around 11.00am. High cloud covering the sun, produced the relatively flat, diffuse lighting that allowed both detail and accurate colours to be shown.
As is the case in most places, the middle part of the day in a tropical rainforest, is very challenging photographically, especially when it is sunny. Between 08.30am and around 04.30pm, not only is the light harsh and bluish, but its effect filtering through the canopy is catastrophic as it creates extremes of bright highlights in patches of sky and the glints and reflections off shiny foliage, juxtaposed with the deepest, darkest shadows. Such extremes of contrast are virtually impossible to deal with and images showing any element of the forest are ruined by blotchy, patchwork high contrast backgrounds and insipid colours.
So what are options if you want to carry on taking photos? Well very often in tropical rainforest areas, it is not sunny at all. There are many days when the sun never breaks through and it is cloudy all the time. The problem of harsh light doesn't then present itself as the light is diffuse and flat all the time. However, not all cloud is created equal as far a rainforest photography is concerned. The ideal types are high in the sky and not particularly dense, so conditions remain reasonably bright and that the light levels remain relatively high and 'workable' on the forest floor. Such conditions produce soft, diffuse light, with reduced contrast and few deep shadow and this is ideal for taking photos that show plenty of detail, whether face and fur detail in a primate, scale detail on a reptile or accuracy of colour in a flower. However, care should be taken with compositions, especially when using wideangle lenses, as it is generally detrimental to have too much 'white cloud' or other highlights areas showing in the background. These are very distracting to the main subject and tend to look 'ugly' in the overall composition.
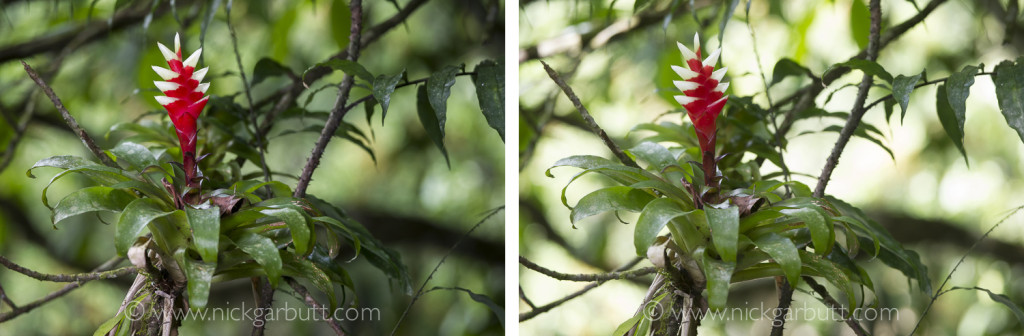
This is a Bromeliad (Guzmania sp.) flower in a Colombian rainforest. The two photos were taken within moments of one another, at the same f-number and with a trace of fill-in flash. The shot on the left was taken when a cloud was covering the sun. In the right hand image the sun had re-emerged from behind the cloud. The lighting on the Bromeliad itself is similar, but the background is the telling element of the picture.
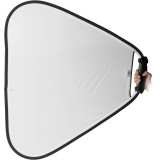
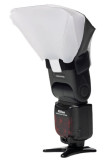
A diffuser like this version made by Lastolite is one way of improving and 'softening' the light on smaller subjects during the middle of the day.
A shading diffuser and two flashes with soft boxes were used to take this photo of a Satanic Leaf-tailed Gecko (Uroplatus phantasticus) camouflaged on dead leaves in the rainforest understory, Ranomafana National Park, Madagascar.
Sadly, there are many occasions when the clouds are low, dark and brooding and this cuts light levels down to a minimum, making any photography very difficult. There is also the likelihood of an imminent downpour, so heading back to the lodge may be the best bet.
If sunny conditions do persist, then the 'dead' period does not have to be totally unproductive, but your options are certainly more limited. I tend to concentrate on photographing small subjects, close-up, where I can control the light and create illumination that is pleasing. This involves using flash guns and diffusers.
Diffusers are simply sheets of translucent white or off-white fabric that are used to 'shade' a subject, such that the light falling on the subject become diffuse. This removes the harsh destructive highlights and shadows. There are a number of commercially available alternatives, but homemade ones can work equally effectively. Just be careful with any composition that shade also covers the background as well as the subject.
Diffusers can 'soften' the lighting, but the addition of some flash to pep-up the subject or 'fill-in' darker areas may also be necessary. Once again it is a good idea to add a diffuser to the flash, so avoid reintroducing harsh light that you have tried hard to avoid (see Flash!).
Early afternoon is normally a quiet time in a rainforest. It's when I catch up with some editing or grab forty winks. There can be a resurgence in wildlife activity later in the afternoon, but this time can also herald the build up of dense cloud leading to heavy rain: clearer mornings and rainy afternoons is a recurring theme in tropical rainforests. Accordingly, you have to be flexible in your approach to photography. I certainly rarely venture out without appropriate wet-weather protection for my gear.
In a many rainforest locations there is the added intrigue of being able to venture out at night and obviously this is when various flash set ups need to be used (see Flash!).
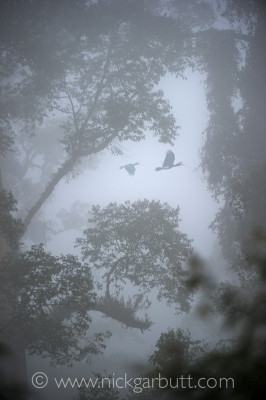
Light levels were extremely low when I took this photo of Rhinoceros Hornbills flying through a misty canopy. The ISO was set at 3000.
The Challenges of Low Light
Low light and rainforests are synonymous, so learning how to adapt and deal with this challenge is fundamental to successful photography.
The ability of change ISO (the camera's sensitivity to light) is one of the major advances of digital over film photography. Increasing the ISO value makes the cameras sensor more sensitive to light, which effectively means less light is needed to create an image. So in low light, the ISO can be increased to maintain shutter speeds at higher values.
Using high ISO values is standard modus operandi in a rainforest, but of course there is a trade-off – at higher ISO values image quality can suffer as these values lead to increased ‘noise’ in the final image. Having said that, the technology of modern sensors is such that even at high ISO values, most cameras can achieve amazing results with relatively low noise levels. How far you can increase the ISO will depend on the model of camera you own, but most current models produce acceptable results at ISO 2000-3200 and some well beyond this.
Further if images do suffer from obvious noise this can be reduced when processing in Lightroom (or similar software programs), providing the original image was taken in RAW.
The other way of maintaining faster shutter speeds that are required to freeze subject movement, is to open the aperture as wide as possible to let the maximum amount of light into the camera. This means selecting smaller f-numbers. Most lenses will go down to somewhere between f/5.6 and f/4, while more expensive lenses offer apertures between f/4 and f/2.8 and occasionally lower (depending on the focal length). With the lens aperture is wide open as possible, you will be achieving the fastest shutter speed the prevailing conditions allow at whatever ISO you have chosen.
"Flash! (Ahhhh, he's a Miracle)"

A trace amount of flash with a soft box diffuser was used to 'lift' this Morpho Butterfly from the background in the Ecuadorian Amazon.
Whether day or night, using flash appropriately is one of the skills that needs to be acquired to make the most of photography in a rainforest. Flash – a pulse of light from an artificial source – is an area that often causes confusion and concern, particularly if you are relatively new to photography. It is certainly true that if used incorrectly or clumsily flash is detrimental to images and can cause distracting highlights, ugly deep shadows and inaccurate colours. However, when used correctly and judiciously it can be hugely beneficial and elevate images from mediocre to memorable.
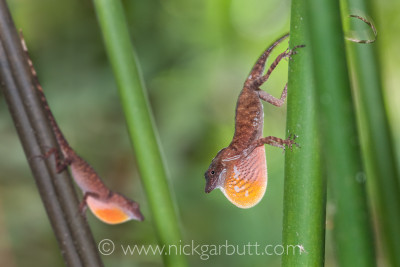
Two flashes were used to balance the illumination between background and subject on these displaying Anole Lizards in a Colombian rainforest.
Fundamentally, flash can be used in one of two ways. Firstly, it can provide all of the light necessary to create an image; obviously this is the case when photographing at night, but can also be the case during the day. And secondly, flash can be used as an augmentation too, and in conjunction with natural light. Here the illumination for the final image is, therefore, provided by a combination of daylight and flashlight. The proportion of daylight versus flashlight is almost infinitely variable and different combinations produce effective results under different circumstances. Whatever, the final proportion, there is always a ‘balance’ between the two forms of light in creating a final exposure. For this reason, this is often referred too as ‘balanced’ or ‘fill-in’ flash.
LumiQuest 'Big Bounce'.

Better Beamer Flash X-tender.
By adding light from a flashgun to existing natural light it is possible to 'lift' subjects from gloomy backgrounds, ‘fill-in’ shadow areas and/or reduce the overall contrast. The issue of course is that this is only possible when the subject is close enough for light from the flash to reach. This working distance is governed by the power of your flash. Pop up flashes on top of cameras are only useful when the subject is relatively close, say less than 3m away, where as larger ‘bolt-on’ flashguns can throw light effectively on to subjects up to 10m-15m away.
Whilst it is always dangerous to over-generalise, a simple no-nonsense approach to 'fill-in flash' is to set your external flashgun to auto TTL (the terms / abbreviations used varies between Nikon and Canon), then reduce the flash output by 1.5-2stops (flash output control marked [⚡+/-]). A more controlled approach that allows greater subtlety and fine tuning is to set the flash to manual and then adjust the power output (full, 1/2, 1/4, 1/8, 1/16 etc) to provide whatever you deem to be the 'correct' amount of additional light falling on the subject.
Further refinements can also be made. When working close to smaller subjects like insects, frogs and reptiles, the use of soft boxes (e.g. Cygnustech Macro Diffuser, Lastolite Micro Apollo or LumiQuest 'Big Bounce') is a good way of keeping the light diffuse and natural looking. I actually make all my own soft boxes - various designs have been adapted to suit different lenses, from 105mm macro to 15mm macro and even the Laowa 24mm probe. Conversely, if a subject is a considerable distance away, a flash extender (e.g. Magmod Magbeam or Better-Beamer flash X-tender) can prove invaluable. These attachments place a Fresnel lens in front of the flash, with the effect that the light from the flashgun is concentrated into a narrower beam and allows it to be projected over a much greater distance. They are often used in conjunction with telephoto lenses.
After Dark
At night the dynamic changes as flash become the sole source of light for the vast majority of images. Here it pays not to be too ambitious. If you see an animals way up in the trees, there is no way you are going to be able to take a meaningful photo, even if you had a flashgun comparable in out put to a lighthouse. Remember light intensity reduces by the inverse square rule, which means it drops off exponentially: if you double the flash to subject distance, the light reaching the subject reduces to one quarter (not by one half).
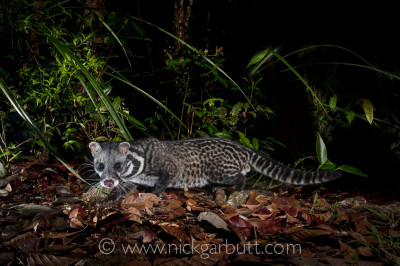
Four flashes controlled by Pocket Wizards were used for this Malay Civet in Maliau Basin, Borneo. Two flashes were positioned to provide back lighting, one flash illuminated the foliage behind and one flash provided the front lighting for the civet and leaf-litter. Considerable experimentation was needed to get it right.
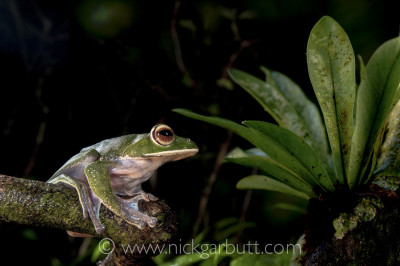
I spent over an hour getting the lighting right on this White-lipped Tree Frog on the Masoala Peninsula in Madagascar. Three flash guns were required.
After dark, I concentrate on finding and photographing smaller things that I can get close too and take time with in setting up flash guns to get the lighting right. This means insects, reptiles and especially frogs that tend to be far more active at night.
Exposure
Good exposures are crucial to good images, although one of the (many) benefits of digital technology is that you have the capability to alter and tweak this once the image has been taken, provided you shoot in RAW (there are dramatically limited options for tweaking with JPEGs). Nonetheless, an understanding of exposure is fundamental to good photography and is certainly necessary if you want to improve as a photographer, as virtually all the other core elements of photography stem from exposure.
Back lighting from a flashgun brings out the hair detail of this Pink-toed Tarantula. A second flash was used to illuminate the front of the spider, but this was deliberately under exposed so as not to dominate.
However, what constitutes ‘correct’ exposure is more subjective. Correct exposure can effectively correspond to whatever the photographer wants it to be. If you want your image to faithfully and realistically replicate the subject in the way you perceived it with your own eyes, then the settings that achieve this constitute the ‘correct’ exposure. If on the other hand you want to evoke something different and more creative in the final image, you might want to deliberately make the final image darker or lighter than reality, but if this results in the desired effect, then this can equally be regarded as a ‘correct’ exposure. Having said this, most people in most situations, would regard faithful representation of reality as equating to ‘correct’ exposure and for the purposes of the following explanations, this is what I will assume.
This Bornean Horned Frog, the leaf litter and the forest back ground are all mid tones that the cameras light meter will assess accurately.
In good light and with the majority of subjects, the cameras built-in light meter will assess things correctly resulting in correctly exposed pictures. There are of course times when the camera can be fooled and it pays to know when these situations are likely to arise and what to do, when you need to deviate from the cameras suggested exposure settings.
Deviation from the cameras exposure setting is called ‘exposure compensation’ and it is extremely useful to understand the fundamentals. A cameras light meter works from a ‘reference point’, which corresponds to a mid-toned subject, sometimes also referred too as ‘neutral grey’. Most subjects in the natural world fall there or thereabouts, into the mid-tone range.
This means in choosing exposure settings (aperture / shutter speed combinations) a camera tries to ‘turn’ everything to a mid-tone. So if a subject is very bright or white, the camera tries to bring it back to mid-tone, by selecting settings that effectively slightly under-expose the subject and tend it towards neutral grey. Conversely, a camera tries to lighten very dark subjects by picking settings that allow too much light into the exposure. Using exposure compensation solves this issue.
In any of the cameras automatic or semi-automatic exposure mode options - aperture priority (A or Av), shutter priority (S or Tv) or program (P) – you can use the +/- command or compensation dial to alter the settings. White or bright objects will need + values to increase exposure (add light, but using longer shutter speeds), whereas dark subjects will need - values to decrease exposure with shorter shutter speed.
The Histogram
However, the best way to accurately gauge the exposure on an image is by looking at the histogram in the display on the back of the camera. This is one of the most crucial and useful tools on a digital camera.
A word of warning – DO NOT rely on looking at the image on the camera’s LCD display to judge exposure. How you perceive this, is heavily influenced by ambient light and the conditions at the time. If you are in a darkened room, the image on the back of the camera might appear bright and well exposed, even if it is not. Conversely if you are outside in bright sunny conditions it can be very difficult to see details and colours on the screen, even if the image is exposed correctly. However, the histogram never deceives, so it is good practice to always check it to assess exposure.

A well-exposed image of a mid-toned subject produces a histogram like this
A histogram is a graph that accurately shows you all the tonal ranges recorded in an image. The left hand edge corresponds to pure black (deep shadows), the right hand edge is pure white (highlights) and everything in between corresponds to all the other tonal values (mid-tones). The height reached at any point on the graph correlates to the quantity (number of pixels) of that tone in the image. The histogram shown here indicates that the image contains a small amount of pure black and deep shadow areas (left hand side), a slight larger amount of pale and highlight areas (right hand side), while the vast majority of the image falls in the mid-tone ranges (middle). Photos of most mid-toned subjects in regular light will produce histograms that look similar to this.
 If an image is over-exposed (more light than necessary), then the histogram for the same subject would be shunted significantly to the right hand side (top) and if it is under-exposed (too little light) then the histogram is weighted heavily to the left (bottom). Hence in a ‘correctly’ exposed image most of the histogram lies in the middle (centre).
I stress that these examples are for subjects that largely fall within the mid-tones, which as I have said constitute the majority of subjects in the natural world. However, if you are taking a photo of a polar bear in a snow storm, you would NOT expect the histogram of a correctly exposed image to sit largely in the middle, instead it should be heavily weighted towards the right hand side as virtually all of the image would be white or near white. Conversely, a black bear sitting in the dark recesses of a forest should produce a histogram where the left hand side dominates, as the elements of the picture are primarily dark or black.
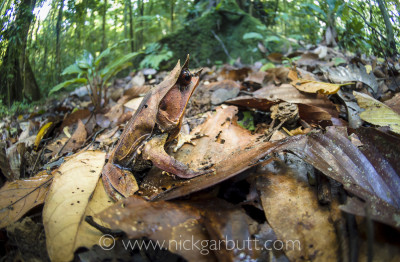
Over 70% of this photo of the tree frog Boophis rappoidesis pure black, so the majority of the histogram would be stacked at the left hand side. The frog and the lead largely fall within mid tones and only small areas of the eyes are lighter tones.
Controlling Movement

These Sparkling Violetears were at a feeder in the Colombian Andes. Even at 1/800th second the movement of the wings is not completely frozen.
Shutter speed is used to control the way movement is rendered in a photo. If all the elements of a photo are completely stationary, then altering shutter speeds will have no bearing on the way the final image looks (assuming the camera is on a tripod). However, if some elements of the picture are moving, these will be recorded in different ways depending on the shutter speed selected.
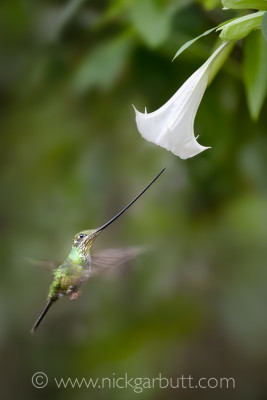
Sword-billed Hummingbird and Devil's Trumpet, Ecuador. Hummingbirds move very quickly, but they do pause momentarily and hover in front of flowers (or feeders). This images was taken with a shutter speed of 'only' 1/50th second, with fill-in flash. Although the rapidly beating wings (and body) are blurred, crucially the head, eye, beak and flower are sharp.
For instance, subjects moving quickly like a bird in flight or a monkey leaping, require a very ‘fast’ (very brief) shutter speed to ‘freeze’ the motion and record the subject sharp in the photo. As has already been stressed attaining 'fast' shutter speeds in the low light of a rainforest is often difficult, hence getting crisp shots of moving subjects is challenging. As a rough guide shutter speeds of 1/500th second are required to freeze quickly moving subjects like flying birds or leaping monkeys.
However, the low light levels of a rainforest can be used to creative advantage. When 'slow' or 'long' shutter speeds are used, the moving elements of a scene can be rendered in a more abstract way that is not apparent to our own eyes: the flowing water of a rainforest stream (or stream anywhere else) is a good example.
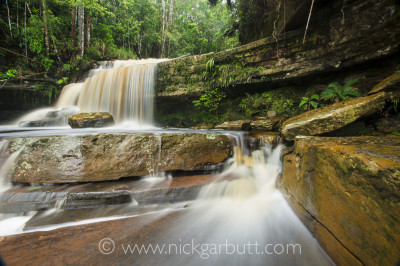
Giluk Falls, Maliau Basin, Borneo. A small aperture (f/22) and polarising filter were used here to reduce the shutter speed to 6 seconds, allowing the flowing water to register as abstract blur. The polariser also helps cut out glare and reflections and saturate the colours.
Let us assume a scene composed with rocks and a flowing stream. The rocks are obviously stationary and the water is flowing over them. The camera must be set up on a tripod. By selecting a ‘slow’ or ‘long’ shutter speed, the moving water will be depicted as an abstract blur, while the stationary rocks will be recorded simply as stationary rocks. The resulting photo will not look at all like the scene appeared in 'real life', but will instead be an artistic interpretation. In such instances, the longer the shutter speed selected, the more impressionistic the final image will be. If a very impressionistic result is desired, then it may be necessary to reduce the shutter speed to several seconds, which is achieved by selecting a low ISO value and a small aperture (large f-number). The shutter speed can be made longer still with the addition of a neutral density filter.
The use of a tripod is stressed here. Photographs like this cannot be taken while hand-holding the camera as it is simply impossible to hold the camera completely stationary while the camera’s shutter is open for a ‘long’ period of time.
Composition
Engage with Your Subject
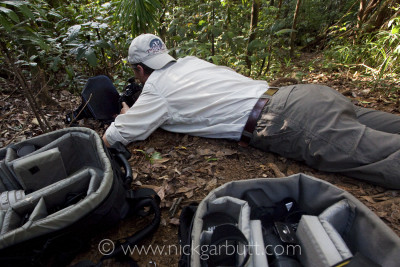
Get down low to engage with your subject. Here I am photographing a stump-tailed chameleon on the forest floor of a rainforest in Madagascar.
When taking photos of animals, the eyes are generally the most important feature. If 99% of a photo is sharp, but the eyes are the 1% that are out of focus, then chances are, the picture will end up in the bin. However, if the eyes are in focus, everything else can be out of focus and it will still work as a photo. For this reason, I always try to use an animal’s eyes as the point of focus or if the animal is more distant, its head.
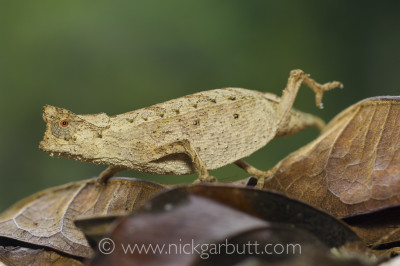
Stump-tailed or Leaf Chameleon (Brookesia superciliaris) walking across leaf litter. Masoala National Park, Madagascar.
In addition, if you can time your picture taking to coincide when the eye contains a catch-light it makes all the difference. Eyes without catch-lights look ‘lifeless’ and ‘dead’, but the inclusion of a catch-light can suddenly elevate a photo. All it takes is waiting for that right moment when the subject lifts or turns its head and the glint in the eye appears or becomes visible. Then you press the shutter.
Positioning yourself appropriately can make all the difference too. When we engage with, and talk to a friend, we look them in the eye. Similarly, to properly engage with a subject it is so much better if you are able to view them from their eye level. You then have a chance of connecting with them as if you were the same species. So if it is possible to get down to eye-level with your subject, so much the better as it makes for more intimate photographs.

Not only was I able to be at eye-level with this Western Tarsier in Borneo, I was also able to create a soft out-of-focus background by virtue of a large aperture and considerable separation between the subject and the background foliage.
Of course the practicalities of achieving this are sometimes challenging; it is rather difficult getting in to the canopy to look a gibbon or howler monkey in the eye. However, there are so many subjects in rainforests where it is easy as they live at or near ground level. With smaller subjects in rainforests this should mean getting grubby by kneeling or even lying on the forest floor.
Where possible, I always try and avoid obtrusive bodies or out-of-focus blobs (especially highlights) in the background. Avoiding out-of-focus highlights is especially challenging in a rainforest as they can result from gaps in the canopy, chinks of lights peeping through foliage, reflections from water drops and shiny leaf surfaces. They are made doubly worse in bright sunny conditions, so waiting for clouds is always recommended.
Messy distracting backgrounds are often impossible to avoid in the tangled undergrowth. Nonetheless, if you have the time to explore several angles then do so. Simply moving a small amount one way or another can make dramatic improvements in what is and is not visible in the background. A clean out-of-focus background (bokeh) helps isolates the subject and concentrates the viewers' attention. It is all too easy when caught up in the excitement and heat of the moment to concentrate totally upon the subject and forget the background. It takes practice to train yourself to pay equal attention to both.
Rule of Thirds
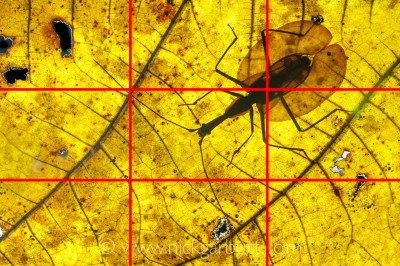
The 'Rule of Thirds': this is a Violin or Mandolin Beetle in Borneo.
Composition – the framing and placement of subjects – is naturally subjective. It is like art, sometimes you love it, and sometimes you hate it. Nonetheless, there are some tried and trusted guidelines worth paying attention too, as following them leads to more pleasing images, more often than not.
The ‘rule of thirds’ is well known as a guide to composition and it is always a good starting point. Imagine dividing your frame into thirds, both vertically and horizontally, like a noughts-and-crosses grid (tic-tac-toe if you are from the other side of the Pond). On some digital cameras there is an option to make a grid visible inside the viewfinder. Each of the main grid lines falls along strong placement axis in the picture and the four points where these lines intersect are each very strong positions to consider placing a main subject.
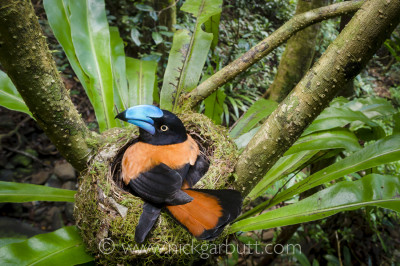
By placing this Helmet Vanga on its nest at the bottom left grid intersection point, the composition naturally benefits from the leaves of the Bird's Nest Fern and branches radiating out to the edges of the picture.
For example horizons very rarely look good when placed along the central horizontal axis, but instead are better if placed roughly one third up from the bottom or one third down from the top. Which depends on where the emphasis of the photo is intended to be. If the land portion of the frame holds the major interest then approximately two-thirds of the picture should contain land and only one-third sky. If you are photographing a dramatic cloudscape then the horizon should be one-third (or even one quarter) up from the bottom, allowing the sky and clouds to dominate. In all instances try to make sure the horizon is horizontal (assuming it is in reality), this is especially true if the horizon includes water.
Where a photo involves say an animal subject in the context of its environment, then the four intersect points on the grid are the obvious placement points. If the animal is facing left, it should be on the right of the frame ‘looking into’ the picture. This principle also holds true if you are composing tight portraits too. The major elements of the photo – say the eyes – should be along a line or at an intersection – but do not forget to allow space for the subject to ‘breathe’ in the frame.
I am definitely not suggesting all your photos should be composed in this way. There are always exceptions to rules and they are meant to be broken from time to time. Otherwise things would get very boring. However, the rule of thirds has stood the test of time for good reason – it works. So it is always a good place to start.